Building a Homelab with KVM and Kubernetes
An overview
Date: 06 April 2023
1 Introduction
I'm planning to build a homelab for the purpose of learning and experimenting. This lab will utilize containers and, if necessary, virtual machines (VMs). It will serve as a personal playground where I can explore and test various technologies.
The main reason for building this homelab is to help me test and learn new technologies that I'm interested in, as well as the ones that I need for work.
To achieve this objective, I have identified the following needs:
- I need a fast and efficient method for provisioning new virtual machines. For that, I created a tool called kvmcli. I designed this tool to simplify the process of creating and deploying new VMs by utilizing a user-friendly YAML file that describes the entire cluster. With just a few options selected, I can effortlessly generate a complete and robust cluster, ready for experimentation.
- To centralize the configuration as much as possible, I will be using Packer to create my VMs and Ansible for configuration management. The ultimate goal is to create a disposable and replaceable ephemeral sandboxes that allow for seamless experimentation.
- Kubernetes will play a prominent role in the homelab, serving as a fundamental component.
A significant portion of the services I require will be based on Kubernetes.
2 Architecture
For a quick summary of the cluster details, please refer to the table below.
| Name | Hostname | IP Address | RAM (MB) | CPUs | Software |
|---|---|---|---|---|---|
| admin1 | admin1.hl.test | 10.10.0.2 | 1024 | 1 | DNS/DHCP/HAProxy/Keepalived |
| admin2 | admin2.hl.test | 10.10.0.3 | 1024 | 1 | DNS/DHCP/HAProxy/Keepalived |
| storage | storage.hl.test | 10.10.0.10 | 1024 | 1 | NFS / Log server |
| monitor | monitor.hl.test | 10.10.0.11 | 1024 | 1 | Prometheus/Grafana |
| master1 | master1.hl.test | 10.10.0.21 | 2048 | 2 | |
| master2 | master2.hl.test | 10.10.0.22 | 2048 | 2 | Kubernetes |
| master3 | master3.hl.test | 10.10.0.23 | 2048 | 2 | |
| worker1 | worker1.hl.test | 10.10.0.31 | 2048 | 2 | |
| worker2 | worker2.hl.test | 10.10.0.32 | 2048 | 2 | Kubernetes |
| worker3 | worker3.hl.test | 10.10.0.33 | 2048 | 2 |
Here's the homelab diagram for our setup.
These are the admin nodes, one serving as the master node IP: 10.10.0.2 and the other as the slave node IP: 10.10.0.3.
Both nodes are equipped with DNS, DHCP, HAProxy and Keepalived services installed and configured, which ensures continuous service availability and failover capabilities.
The nodes are configured with a virtual IP: 10.10.0.20, which provides a single IP address to contact with.
My Kubernetes cluster will consist of 6 Nodes in total 3 of these nodes will act as Master nodes 10.10.0.21-23.
While the other 3 as worker nodes 10.10.0.31-33.
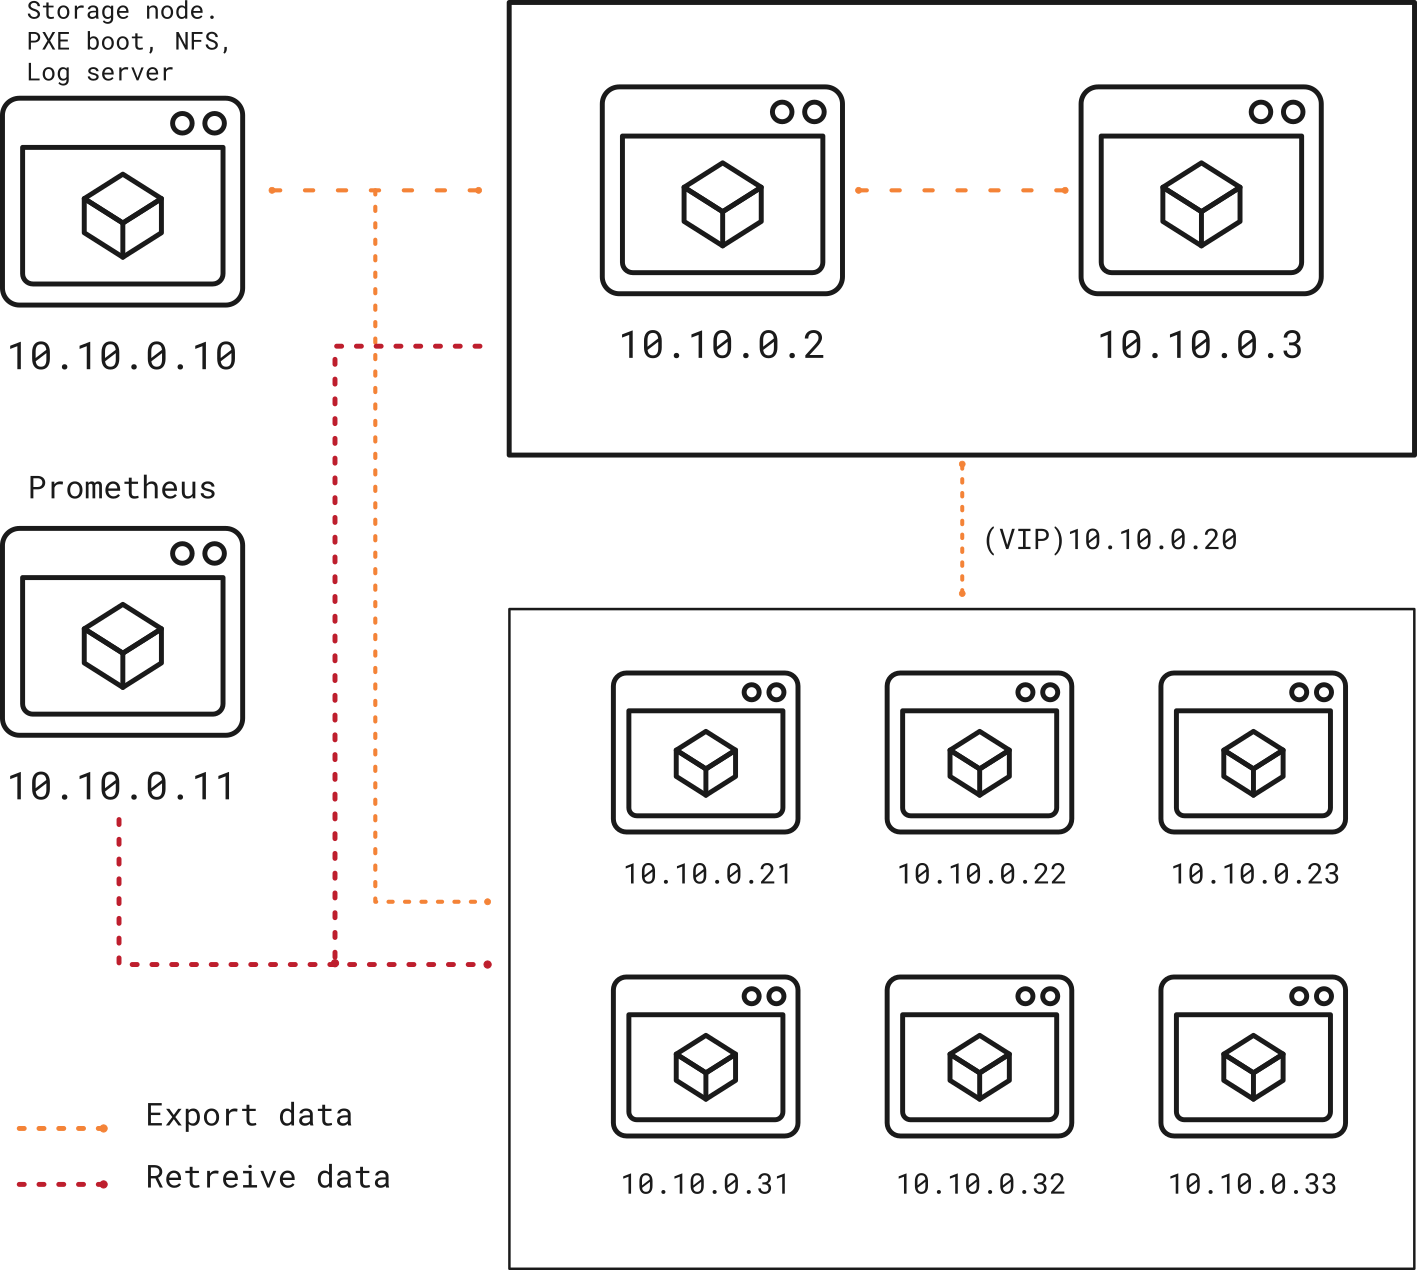
Figure 1: Homelab diagram
This was an overview of my homelab plan. In the following blog posts I will provide detailed setup and configuration guides for each component of the homelab.
I will be keeping the list of blog posts below up-to-date with each new article related to this homelab that I publish on my blog.
3 VM Setup Guides
This was an overview of my homelab plan. The links below provide detailed setup and configuration guides for each component of the homelab.
